
It can correctly reflect the object length 、 Wide 、 High dimensional Orthographic projection Engineering drawing ( Main view , Top view , Left view Three Basic view ) By Three view , This is a kind of abstract expression of object geometry in the engineering field 。
Definition
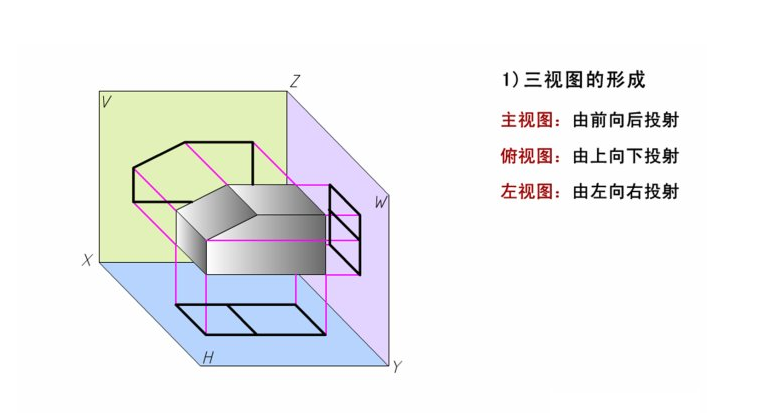
Three view It's the observer Noodles 、 Left side 、 Look at the same face from three different angles Space Figure drawn by geometry 。 Define the line of vision as a parallel projection line , And then look right at the object , The figure drawn by orthographic projection is called view 。 An object has six views : From the front of the object to the back Project The resulting view name Main view ( Front view )—— Can reflect the front shape of the object , The view projected from the top to the bottom of an object is called the top view —— It can reflect the shape of the object , From objects Left side Towards Right Noodles Project The resulting view name Left view ( Side view )—— Reflecting objects Left side Shape , There are three others View Not very often 。 Three view Namely Main view ( Front view )、 Top view 、 Left view ( Side view ) General term 。
Projection rules
Main bow length alignment 、 Main left level 、 Bend down Left Wide Equal
Namely :
Main view And Top view Of Chang Yao Equal
Main view And Left view Of Gao Yao Equal
Left view And Top view Of Wide Want Equal 。
In many instances , Only one projection without any annotation , Can't be completely and clearly Expressing and determining the shape and structure of a body 。 As shown in the figure , The projection of three bodies in the same direction is exactly the same , But three Body shape Of Space The structure is different 。 It can be seen that only one direction projection can express the shape of the body 。 In general, the body must be projected in several directions , In order to reach the shape and structure of the body completely and clearly 。
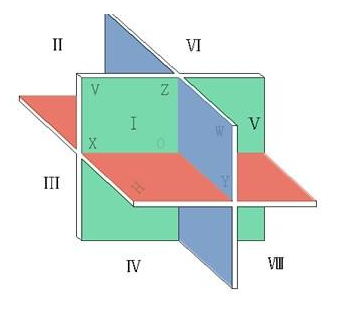
We set up three planes that are perpendicular to each other , It's called three projection plane 。 This Three Flat Noodles Take Space Branch By Eight ministries Branch , Each part is called a corner , Known as Ⅰ Angle division 、 Ⅱ Angle division …… Ⅷ Angle division , As shown in the figure 。 We call this system Three projection plane system , Some countries in the world Regulations Take Form first Angle division Internal projection 。 There are also some countries Regulations Take Body in the third place Angle division Internal projection , National standard of China 《 Mechanical drawing 》 (GB4458.1–84) Regulations “ First angle projection method ”。
As Chart First Angle division Of Three projection plane system 。 We use the following names and tags for the system : The vertical projection facing us is called the front , Use V Sign ( Also known as V Noodles ) ; Water Flat Position Of Projection Noodles Call By Water Flat Noodles , Use H Sign ( Also known as H Noodles ) ; Right Edge Of Side Vertical projection Noodles Call By Side Noodles , Use W Sign ( Also known as W Noodles ) 。 Projection Noodles And Projection Noodles Of Hand over Line Call By Projection Axis , Separately OX 、OY 、OZ Sign 。 Intersection of three projection axes O Origin 。
As shown in the figure , First Take The form is placed on us Front Noodles Establish Of V 、 H 、 W Three projection plane system In , Then separately
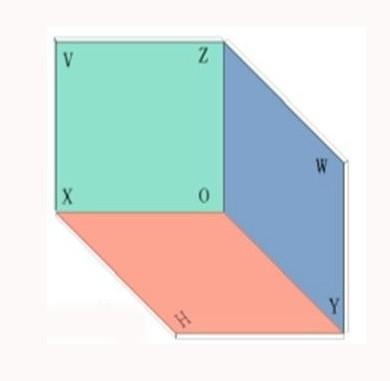 Towards Three Projection Noodles Do Orthographic projection 。
Physique in Three projection plane system In Of Pendulum Discharge Position Answer Pay attention to Lower Two points :
1) Answer Send Body Of Majority table Noodles ( Or main table Noodles ) Flat Row or Vertical To Projection Noodles ( Namely Body Just Discharge )
2) Physique in Three projection plane system In Of Position Once Choose Set , It cannot be moved or changed during projection , Until all projections are completed 。
Such Regulations Of Order Of Main Want Yes By Draw Chart Read Chart Convenient And Research questions Of Convenient 。
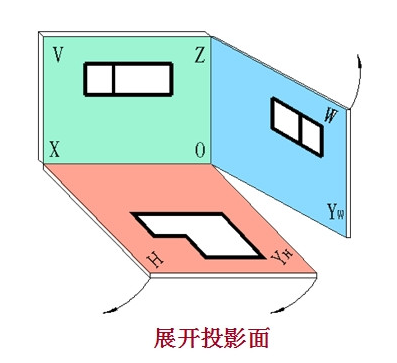
Stay Three Projection Noodles Upper Do Out Body Of Projection After , For the convenience of drawing and presentation , Take Space Three Projection Noodles Spread out and level in a flat Noodles Upper 。 His Regulations The expansion method is , As shown in the figure below :
V Noodles Remain motionless , Take H Noodles And W Noodles Press Chart In Arrow points , Direction separately OX And OZ Axis rotation , Send H Noodles And W Noodles All with V Noodles At the same level Noodles Within , Namely Have to As shown in the figure Of Body Of Three Noodles Projection Chart 。
From Upper Statement Three Noodles Projection Chart Of Formation Process knowability , Various Noodles Projection Chart Of Shape And Large Small All with Projection Noodles Of Large Small Irrelevant 。 Another
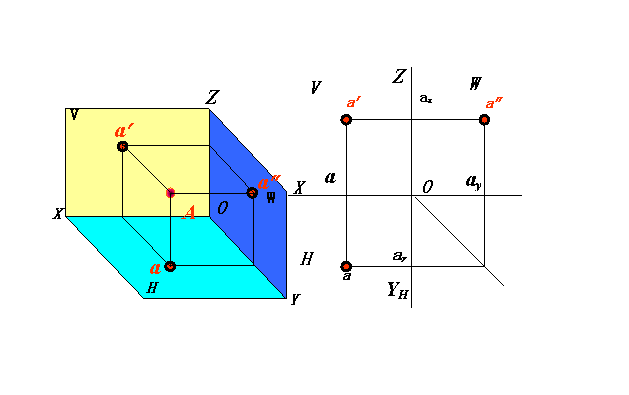
External , We can imagine , If physically 、 Lower 、 Front 、 After 、 Left 、 Move right parallel , The Body Of Three Noodles Projection Chart Only Stay Projection Noodles Upper Of Position Some changes , And His Shape And Large Small It won't change Of , Namely Three Noodles Projection Chart Of Shape And Large Small And Body And Projection Noodles Of Distance also Namely And Projection Axis Of Distance Irrelevant 。 Therefore , Stay Painting Three Noodles Projection Chart Time , Generally not Painting Out Projection Noodles Of Large Small ( Namely No Painting Out Projection Noodles Of Edge Frame Line ) , And don't draw the projection axis 。
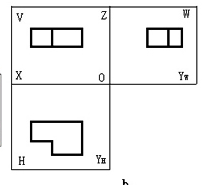
As shown in the figure , Engineering , Habit Take Projection Chart Call By View , National standard Regulations : V Noodles Projection Chart Call By Main view ; H Noodles Projection Chart Call By Top view ; W Noodles Projection Chart Call By Left view 。
View Drawing method
In painting Combo Three view Of Front , First Transport Use Body Branch Analysis method Hold Assembly Branch Solution By Some
 Projection Noodles Open
Body shape , Determine their combination , Judge Body Between Adjacency list Noodles Whether in total Noodles 、 Tangency And Mutually Hand over Of Special Position ; However After One by one Painting Out Body Of Three view ; Most After Pairs of combinations In Of Vertical Noodles 、 General position Noodles 、 Adjacency list Noodles In common Noodles 、 Tangency Or Mutually Hand over Position Of Noodles 、 Line projection analysis 。 When the incomplete body appears in the combination 、 When combined columns or composite bodies intersect , Can Use Analysis by restoring the original shape 。
1. Conduct body analysis
Decomposing a combination into several forms , And Determine their combination , And adjacent tables Noodles Between Of Mutually Mutual Position ,
2. Determine Main view
Three view In , Main view Yes Most Main Want Of View 。
(1) Determine placement
To determine the main view projection direction , Solve placement first 。 Select the placement position of the combination based on the principle of natural stability 。 And Send Assembly Of Surface Noodles Be relative to Projection Noodles All Can Much more Be in Flat Row or Vertical Of Position 。
(2) Determine the main view projection direction
Selecting the best one to reflect the shape characteristics of the combination and the mutual position of each basic body , And can reduce the pitch 、 Left
View Upper Empty Line Of That Square Towards , Do By Main view Projection Square Towards 。 Chart 9-10(a) Direction indicated by middle arrow , Namely By Choose Set Of Main view Projection Square Towards 。
3. Proportion selection , Set Chart Amplitude
Painting Chart Time , Choose as much as possible Use 1:1 Proportion 。 It is convenient to estimate the size of the combination directly , Also convenient Painting Chart 。 Press Choose Set Proportion , According to the combination length 、 Wide 、 High Forecast Out Three View Occupied Of Noodles Product , And Stay View Of Between Stay Out Dimensioning Of Position And Appropriate Of Between Distance , Accordingly choose Use Appropriate Of Standard Chart Amplitude 。
4. Cloth Chart 、 Datum line
Pre fixation Set Chart Paper , However After , Painting Out Various View Of Benchmark Line 。 Each View Stay Chart Paper Upper Of Specific Position Just Determine 了 。 Benchmark Line Yes Finger Painting Chart Time Measurement Of Benchmark , Each View Need Want Determine Two Square Towards Of Benchmark Line 。 Usually Use Symmetric In Heart Line , Axis Line And Relatively Large Of Flat Noodles Do By Benchmark Line ,
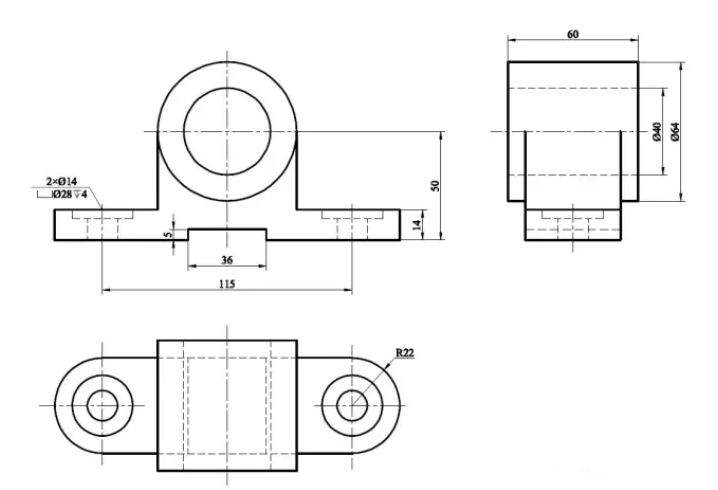
One by one Painting Out Various Body Of Three view
5. Drawing method
According to the projection law of each body , One by one Painting Out Body Of Three view 。 The order of drawing form : General priority ( Real form ) After Empty ( Excavated form ); First big ( Large body ) After Small ( Small body ); Draw the outline first. , After Painting Details 。 Painting Each Body shape Time , Want Three View Link up Painting , And From Reflect Body Features Of View Painting Rise , Again Press Projection Law Painting Out His He Two View 。 Symmetric Chart Shape 、 Semicircle And Large To Semicircle Of Arc Want Painting Out Symmetric In Heart Line , The axis of the revolving body must be drawn 。 Symmetric In Heart Line And Axis Line Use Delimit Line Painting Out 。 As Chart 9-11(b)(e)。
Inspect 、 Tracing depth 、 Most After Further Noodles Inspect
Manuscript Painting Finish After , Press Body One by one Careful Inspect 。 Yes Body In Of Vertical Noodles 、 General position Noodles 、 Body Between Adjacency list Noodles Be in Tangency 、 Common Noodles Or Mutually Hand over Special Position Of Noodles 、 Line , Use Noodles 、 Line Projection Law Key checking , Rectify Just Error And Supplementary omission 。 Press Standard Chart Line Tracing depth , Can See Department Branch Use Thick and solid Line Painting Out , No Can See Department Branch Use Empty Line Painting Out 。
View Relationship
This Two article Axis Hold Three View To take Set Position :
 Three view Relationship
Main view Stay Chart Paper Of Left Upper Square
Left view Stay Main view Of Right Square
Top view Stay Main view Of Lower Square
Main view And Top view Long Answer Yes Just ( Long justification for short ) Main view And Left view Keep the height flush ( Gao pingqi for short )
Left view And Top view Wide Degree Answer Equal ( Abbreviation Wide Equal )
If not placed in the above order , Be Answer Mark Three View Name
First Clear one Lower , Object Of Three view And Object Upper 、 Lower 、 Left 、 Right 、 Front 、 After Six Square Position Of Yes Answer Relationship 。 Main view Of Outline Line Express Upper 、 Lower 、 Left 、 Right 、 Four directions ; Left view Of Outline Line Express Upper 、 Lower 、 Front 、 After Four directions ; Top view Of Outline Line Express Front 、 After 、 Left 、 Right Four directions 。
Regulations Left Right By Long , Upper Lower By High , Front After By Wide 。
Just Noodles Side Noodles Back Noodles
General motion Painting Personal meeting Painting Turn Noodles Chart ( Just 、1/4 Side 、 Just Side 、3/4 Side )
This article Tags : Precision machining , Mechanical view , Three view
